Bergdala Spinnhus


How to expand a profile threading into a detailed threading

(note: all the following is written for so called "sinking shed" - for those accustomed to "rising shed" notation, either reverse the tie-ups or (much simpler) weave as is, then turn the cloth over)

So how does one expand a profile threading into a thread-by-thread one (a threading containing all the ends, each one marked in the written threading diagram)?

Let us continue with the same checkerboard pattern, the one we have used in "about profile patterns", and which is also used in "more about profile patterns":

enkelt partimönster
Every square in the profile draft is seen as a "shorthand" represtentaion of something else - something that is not pre-determined: a number of ends woven in a specific way.

Therefore, we first have to decide which binding (structure) we want to use.

The most classical in the Swedish context would be a "true dräll" - that is a (usually monochrome) checkered tablecloth, where the checks consist of blocks with warp-effect contrasted with blocks with weft-effect.
One of several possible bindings (structures) is 4-shaft broken twill:
warp-dominant broken twill

one repeat of warp-dominant broken twill
weft-dominant broken twill

one repeat of weft-dominant broken twill
But... they go "in opposite directons"?
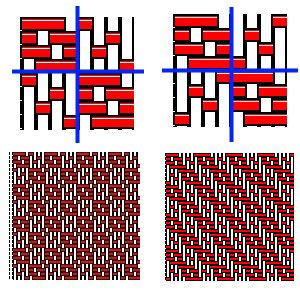
The reason is that we want "a clean cut" between the different blocks. A clean cut means that where the blocks meet, there should be a distinct "line": if the outer end/pick in one block is on top, the meeting end/pick of the other block should be under.

The two examples to the left show a clean cut - in the smaller scale there is a distinct checkered effect, even when there are only four ends per block.
In the two right examples the checks are less distinct. (This can of course be used at will, but it is not the traditional way to weave dräll.)
clean cut vs "un-clean"

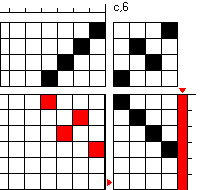
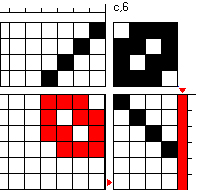
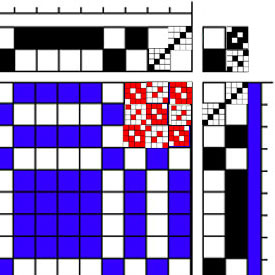
So you make the substitution, square by square...:
one blue square in the drawdown equals one square of weft dominance, one white square equals one square of warp-dominant twill.
In the same way one black square in the tie-up equals the tie-up for weft effect, while a white one equals the tie-up for warp effect.
substitution started


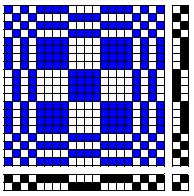
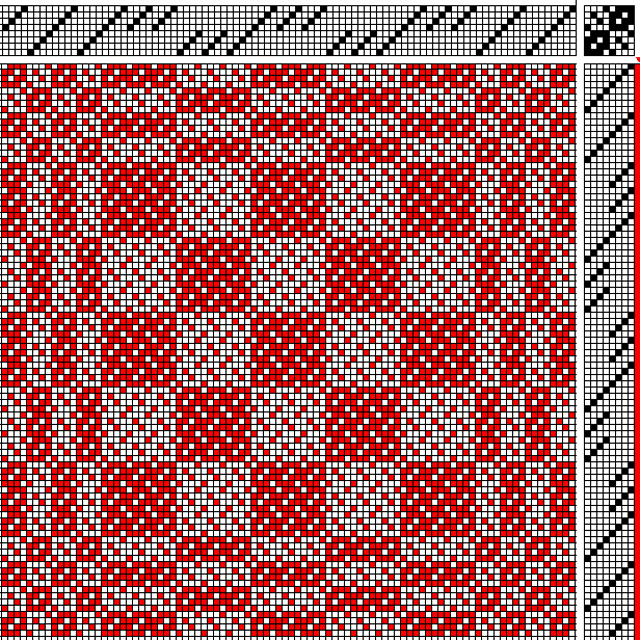
When all substitution is done, we have a complete threading, treadling and tie-up diagram:
done
(According to traditional Swedish notation the diagram is now in red-and-white. Blue-and-white means, according to the same tradition, that we are seeing a profile draft.)

Is it necessary to write a thread-by-thread diagram? More about that later.

But let us first look at a different interpretation of the profile draft.

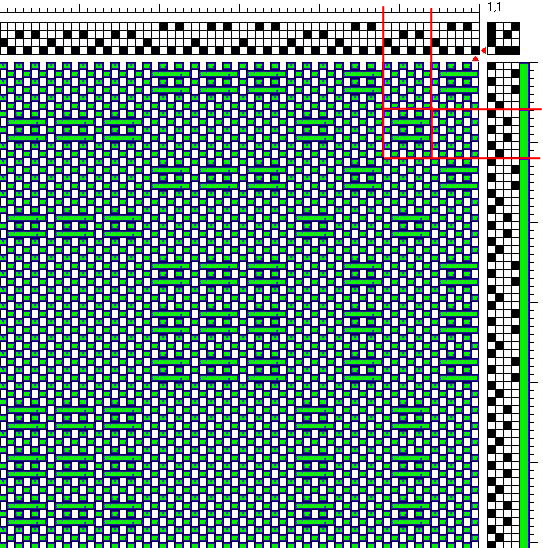
We could choose a lace weave - the result could be a curtain, perhaps?

curtain?
In this case we let each square from (profile) shaft 1 represent 6 ends threaded 4-1-4-1-4-3 and each square from (profile) shaft 2 represent 6 ends threaded 4-2-4-2-4-3.
Do the same for the treadling order.
As we can see, every other end is threaded on either shaft 4 or shaft 3 - as we have 2 (pattern) blocks, we only need 4 shafts for this pattern.

(Yes, the shafts are numbered "the Swedish way" - this doesn't matter, numbers are unimportant, just look at the diagram: the shaft nearest the weaver is the shaft nearest the weaver, regardless of what we choose to call it. We could call it 1, 4, grandfather or Miss Muffet...)

There are many more possibilities fo how to interpret the profile pattern - for some other suggestions see "about profile patterns" and "more about profile patterns".


So, is it necessary to write a thread-by-thread diagram?

Sometimes, perhaps it is - for example if one is making a "recipe" for others to follow, or if one has a complicated pattern with many colours, or...

Often we can find threadings looking like this (still based on the profile above):

simplified threading?
Sometimes, if we want (for example) two more big squares in the pattern above, there can be one more line:
simplified threading?

This method saves space, but is not always very easy to follow when sitting at the loom, threading...

A different way of thinking is to just follow the block threading.

Compare the first example above: the block pattern, completed with a note saying "use 4-shaft broken twill" would be perfectly adequate, if we know how to thread, tie-up and treadle a broken twill.

For the lace example, we may want to be a little more explicit: "one square = 6 ends", possibly with the addition "block 1 is threaded 4-1-4-1-4-3, block 2 is threaded 4-2-4-2-4-3"

In the (Swedish) books this is often referred to as having "different threading units" for different bindings (structures). (Note: this is different from the "unit weaves" of, for instance M v d Hoogt - the Swedish definition is more open than hers.)

Myself, I find it much easier to use a notation like this last than to have a very long line of many squares - a long threading diagram that I have to break into logical "handling" units.

  © Kerstin Fröberg 2013